En-Suite Reveal – Renovation Diary

I’m so excited to be bringing you the very first room reveal in our new home. If you’ve been following me since the start of the year you’ll know we bought a house and got the keys just as lockdown started. And then it’s been 4.5 months of renovation work. We’re still not totally done and some rooms still have work that needs doing. But I’m bringing you the very first one which is our en-suite reveal.
The en-suite is our only 100% finished room at the point of writing this. Some rooms are very close to being finished or they are just waiting for some furniture. The en-suite has had quite the change since we bought the house so I’m going to run through what we did to the room and how it looks now.

En-suite reveal: Before the renovation
Above is the best photo I could take of the en-suite because it’s a tough size/ shape room to photograph. But originally when you walked in there was a cupboard on your left. Then beside it is a single shower cubicle. Then on the right was a toilet and sink. When we first saw the room we felt it didn’t seem like a good use of space. And neither of us wanted a single cubicle shower. Plus they had carpet on the floor which just makes me feel sick thinking of. It’s such an old-fashioned thing to do so that was one of the first things to go!
Before our en-suite reveal, I’ll talk you through what we actually did to the room. To begin with, we completely stripped out the room, absolutely everything came out. Now when I saw ‘we’ during this post I don’t mean me, I mean Luke and his dad mainly. I’ve not picked up any DIY skills since moving. Stripping out the room included the suite, the cupboard, the tiles, the radiator, absolutely everything.

During renovation
Once it was stripped we inverted all of the plumbing so that the toilet and sink were plumbed on the left. And the shower on the right. We also re-plumbed the radiator as we were moving its location. Once everything was re-plumbed it was a case of building the shower area. This included creating a step for the shower tray to sit into, although it’s not a tall step. Next up was plastering which you’ll know was a bit of a challenge if you’ve read my renovation diaries.
Once plastering did happen the wall and floor tiles could be laid (including around the shower step and boxing). And the ceiling and coving could be painted ready for the bathroom to be fitted. This included our toilet, sink, and cabinets around it, our mirrored cabinet, and of course, the shower. There was quite a lot of plumbing to do as our shower head is fixed into the ceiling and we got a digital shower (more on that below). So the fitting took a bit of time. But it was well worth the wait for the room and this en-suite reveal.

En-suite reveal: Shower area reveal
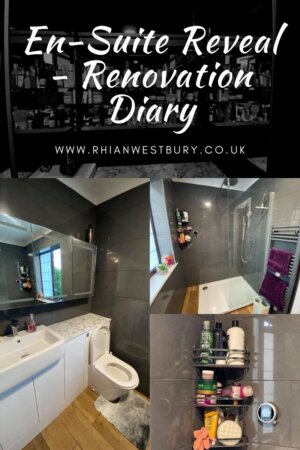
As you walk into the room when you first look right you’ll see an anthracite towel radiator. Originally the radiator was under the window but it didn’t feel practical and you couldn’t hang towels from it. Now it has a perfect spot and we can fit some towels on it (even if it’s not the neatest looking thing). Our Joseph Joseph bin sits underneath it out of the way.
Then onto the shower itself which has a large double-sized tray so you have plenty of room. The shower tray and screen came from Victoria Plumbing. Although we do think we’re going to get a slightly longer piece of glass eventually. The shower itself is an Aqualisa Q digital shower which was the most indulgent spend for the room. There are lots of snazzy features on it such as digital temperature control, change of pressure, saving your settings, etc. We need to play around with it more but it’s been amazing so far. We opted for the wall-fixed drench waterfall head and the movable handheld.

The rest of the shower area
One thing I love about the shower is the fact that you can stand back either on the tray or on the back tiles to use products without being under the water. Little things like that make a difference. We have a triple-shelved caddy wall mounted in the corner to keep all of our products safe.
The last thing we did before the en-suite reveal was to sort out the window. So this space used to be a tiny fourth bedroom. But two owners back converted it into an en-suite for what then became the master bedroom. But as it was a bedroom the window was a standard one and not frosted or anything. So anyone looking through the window from neighbouring houses/ gardens would be able to see EVERYTHING. Surprisingly this wasn’t something I fancied so until we get the windows totally re-done we bought some frosted window film from Amazon to put over it. It still lets light in but our neighbours won’t be able to see us *phew*

The left side of the room
Before I talk about the units etc I thought I’d speak about the tiles we chose. We got Rustic Wood Effect Tiles for the floor and they are beautiful and don’t feel as cold as normal tiles. We’ve already got these same tiles for our downstairs toilet. And when we get to do our bathroom it’s likely we’ll go for the same floor tiles again. For the wall tiles we wanted to stick to a neutral colour theme so went for Grey Polished Porcelain. They’re smooth, smart and gives us options with colour which we can inject through towels and bath mats.
We wanted to build in as much storage as we could so we picked the Reeves Nouvel gloss white unit with marble worktop again from Victoria Plum. We changed the configuration of the units but it gives us quite a big cupboard under the sink and then another thin one which is great for toilet rolls and cleaning products. With this unit, the basin came included and it’s a really good depth. We picked out a pretty basic but smart-looking mixer tap and a rimless wall-hung toilet. Being rimless there are fewer places to clean *hooray* and it has a lovely soft close lid.

En-suite reveal: The accessories
Now onto my favourite bit which is the mirrored cabinet of dreams. I knew I wanted plenty of storage in a cabinet for all of my skincare and after lots of research this one came up trumps. Again it was a bit of a splurge but it does everything we want it to. The Eliza Demist Cabinet from Illuminated Mirrors has an inbuilt socket inside for charging toothbrushes/ shavers. It has a sensor to turn on a bright light which also has a demisted in it. And I’m not kidding it demists so quickly after a shower. The mirrors are internal and external so you can keep it open to do your skincare routine which I love. Plus it’s huge. There’s a single door section which is Luke’s and a huge double door section which is my haven.
We’ve tried to keep the actual countertops quite clear so there’s little in the way of decoration. Although our beautiful purple towels are from Dunelm as they’re the softest we’ve found. And our bath and toilet mats are shaggy soft ones from Marks and Spencer.
We did go over our initial budget for this room due to various things we hadn’t anticipated. But the total cost was just over £4,000 to do all of the work. For us, big costs included the shower and mirrored cabinet themselves so we could have reduced this cost quite a bit if we’d wanted to.
So that’s it, that’s my en-suite reveal. It’s been a long time coming but I’m so excited to be able to share the first room in our house.
Pin It


15 responses to “En-Suite Reveal – Renovation Diary”
Leave a Reply
All About Me

Rhian Westbury
Travels and Destinations

Nothing currently planned
This looks stunning! I would love a grown up bathroom like this in our home.
Wow, it looks absolutely incredible! I especially love that mirrored cabinet as it looks amazing – it looks like the perfect storage space.
It looks amazing, we are looking at renovating our bathroom so have been looking at tiles and showers recently
Wow, this is an amazing transformation! Our house is from the 1940s and we have been doing little things but nothing like that!
Wow what an amazing difference to your en suite! It looks absolutely incredible – I love how you have built the storage into it as well.
Thanks! Storage is what you need in a bathroom! x
It is so lovely! I could only wish to have a bathroom like that. You did a really good job, and even if you did go a little over budget, it is definitely worth the cost!
It looks great! the grey tiles are an excellent choice, i agree trying to get as much storage as you can, its a good idea and is able to keep it all clutter free.
Totally agree. I’m trying to keep as much off the counters and sides as possible, if nothing else it makes cleaning easier x
That looks stunning, I love the colour of the tiles. It all looks well laid out and practical
I absolutely LOVE those grey tiles. I’ve been looking for something similar for our bathroom!
It looks beautiful Rhian! I wish I had an en-suite as sleek as this. I live in a shared house and we keep the bathroom really clean but it really needs a refresh.
Wow, that looks amazing! We really need to get our en-suite and bathroom done, but I just don’t know where to start.
I guess it depends if you want a full renovation or more of a fixer-upper x
Wow! I love it , I never imagined it to look like this , it looks so flashy and I’d be in there all day ha!